Overview
Hummingbird is a hardware scheme designed to
interface with a free data-analysis
engine: VivaPlanet (http://www.vivaplanet.io/) . Hummingbird will send information about the health of it's environment
to the VivaPlanet data-analysis engine to allow the user to predict and better
understand the health of the environment of Hummingbird. Anyone can use an
ethernet, GPRS or WiFi enabled Internet of Things or wearable device to
interface with the VivaPlanet data analysis engine. These are the instructions
on how to build a simple serial interface to this engine.
There are three major parts to this project. There is the free
VivaPlanet data-analysis engine, the coordinator node and the sensor node. The
senor node(s) send information to the coordinator node. The coordinator node
manages inputs from various sensor nodes and sends this data periodically to
VivaPlanet. The user can then go look at the big data analytics on their free
VivaPlanet website.
We choose GHI (https://www.ghielectronics.com/)
and Seeed (https://www.seeedstudio.com/)
to purchase a lot of the hardware. GHI uses .NETMF capable hardware which is
great. I'm using .NetMF 4.2 for this project.This means I can write embedded
code in C# and have it cross-compile in Visual Studio 2012 and run on the GHI hardware. This is really
great because I get all of the power and flexibility of C# when coding. There
is some overhead in this on the hardware side but for a light weight
application like this it is a really great way to quickly prototype.
Figure 1: This is an
overview of how Hummingbird could be used to send information to VivaPlanet.
Step 1: Building the
sensor node
A functional test can
be easily constructed with 2 XBees and a BJT Oscillator (more details on how to
do this are here: http://meca-labs.blogspot.com/2014/05/fun-with-xbe...)
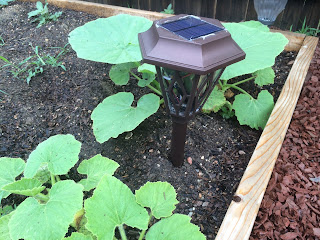
The sensor node is the easiest node to assemble it is shown in Figure 2 below.
We hacked into a solar powered light and added a moisture sensor to the bottom.
Then we ran a wire up to the top and stored the XBee (series 2) and power
system. The XBee has 4 ADC converters and we used one of these to poll the
moisture sensor and send the information to the coordinator node. We just used
XTCU to program the sensor node.
Figure 3: Sensor node
deconstructed
Figure 4: Sensor node
in action
Step 2: The coordinator
node
The coordinator node is also the same solar power set but it
consists of a GHI CerbuinoBee an XBee (series 2) and some sort of way to
connect to the internet. We've demonstrated this project with a GHI GPRS
module, shown in figure 5, and a USB-Serial Module. Using the Serial interface
in C# is really simple and that's what we'll focus on here. Getting the GPRS
working is tricky and is another project in itself.
Figure 5: Coordinator node with a SIM900 GPRS
Module.
Step 3: Connect to
VivaPlanet
Overview
Hummingbird is a hardware scheme designed to interface with a free data-analysis engine: VivaPlanet (http://www.vivaplanet.io/) . Hummingbird will send information about the health of it's environment to the VivaPlanet data-analysis engine to allow the user to predict and better understand the health of the environment of Hummingbird. Anyone can use an ethernet, GPRS or WiFi enabled Internet of Things or wearable device to interface with the VivaPlanet data analysis engine. These are the instructions on how to build a simple serial interface to this engine.
There are three major parts to this project. There is the free VivaPlanet data-analysis engine, the coordinator node and the sensor node. The senor node(s) send information to the coordinator node. The coordinator node manages inputs from various sensor nodes and sends this data periodically to VivaPlanet. The user can then go look at the big data analytics on their free VivaPlanet website.
Figure 1: This is an
overview of how Hummingbird could be used to send information to VivaPlanet.
Step 1: Building the sensor node
A functional test can
be easily constructed with 2 XBees and a BJT Oscillator (more details on how to
do this are here: http://meca-labs.blogspot.com/2014/05/fun-with-xbe...)
The sensor node is the easiest node to assemble it is shown in Figure 2 below.
We hacked into a solar powered light and added a moisture sensor to the bottom.
Then we ran a wire up to the top and stored the XBee (series 2) and power
system. The XBee has 4 ADC converters and we used one of these to poll the
moisture sensor and send the information to the coordinator node. We just used
XTCU to program the sensor node.
Figure 2: Functional
example of 2 XBees sending ADC data from a BJT Oscillator to a coordinator
node.
Figure 3: Sensor node
deconstructed
Figure 4: Sensor node
in action
Step 2: The coordinator node
The coordinator node is also the same solar power set but it consists of a GHI CerbuinoBee an XBee (series 2) and some sort of way to connect to the internet. We've demonstrated this project with a GHI GPRS module, shown in figure 5, and a USB-Serial Module. Using the Serial interface in C# is really simple and that's what we'll focus on here. Getting the GPRS working is tricky and is another project in itself.
Figure 5: Coordinator node with a SIM900 GPRS
Module.
Step 3: Connect to VivaPlanet
Connecting to VivaPlanet is easy and mostly a software based task.
I'll post the code in github and link it here. But for now there is a tutorial: http://meca-labs.blogspot.com/2015/07/hummingbrid-ii-c-netmf-and-zigbee.html


No comments:
Post a Comment